MySQLでも基本同じだと思う。MariaDB専用のVPSを用意して、インターネット越しに接続してみました。
理由はふたつ。このサイトが動いているサーバー上のMariaDB 10.3をサイトを止めずに10.4にバージョンアップしたかったのと、Nextcloudを動かしているTime4VPSのStorage VPSのメモリ確保のためMariaDBを他のサーバーに移したかったから。
MariaDB専用VPSの準備
このVPSには他に機能を持たせないので、OSをインストールしたらあとはFEMPでWebサーバーを立てるのデータベースインストール部分だけやればOK。
ファイアウォールの設定も、FreeBSDの初期設定中のipfw.rulesに対してメールやWebまわりの設定を削除できます。
#! /bin/sh

ipfw -q -f flush

# loopback
ipfw -q add 10 allow all from any to any via lo0
ipfw -q add 20 deny all from any to any 127.0.0.0/8
ipfw -q add 30 deny all from 127.0.0.0/8 to any
ipfw -q add 40 deny tcp from any to any frag

# statefull
ipfw -q add 50 check-state
ipfw -q add 60 allow tcp from any to any established
ipfw -q add 70 allow all from any to any out keep-state
ipfw -q add 80 allow icmp from any to any

# open port ssh(20022), dns(53), ntp(123)
ipfw -q add 100 allow tcp from any to any 20022 in
ipfw -q add 110 allow tcp from any to any 20022 out
ipfw -q add 120 allow udp from any to any 53 in
ipfw -q add 130 allow tcp from any to any 53 in
ipfw -q add 140 allow udp from any to any 53 out
ipfw -q add 150 allow tcp from any to any 53 out
ipfw -q add 160 allow tcp from any to any 123 in
ipfw -q add 170 allow tcp from any to any 123 out

# open port mysql(3306)
ipfw -q add 300 allow all from xxx.xxx.xxx.xxx to any 3306 in
ipfw -q add 310 allow all from xxx.xxx.xxx.xxx to any 3306 out

# deny and log everything
ipfw -q add 500 deny log all from any to any
逆に追加されているのが3306ポート。MySQL/MariaDBへの接続を特定のIPアドレスに対して開放します。
データのコピーとMariaDBの設定
続いて移行元のMariaDBからデータの抽出作業。WordPressのバックアップにあるとおり、mysqldumpを使って取り出します。
mysqldump -uroot -p db_name > db_name.sqlこのデータを新たに用意したMariaDB専用VPSにコピーして取り込みます。
mysql -uroot -p db_name < db_name.sqlそしてリモートからこのデータベースを操作可能なユーザーを作成します。
CREATE USER user_name@xxx.xxx.xxx.xxx IDENTIFIED BY ‘P@ssW0rd’;
GRANT ALL PRIVILEGES ON db_name.* TO user_name@xxx.xxx.xxx.xxx;
これでリモートからデータベースに接続できるようになります。
mysql -uuser_name -p -h yyy.yyy.yyy.yyyアプリケーションの設定
コマンドラインからの接続なら上記のとおり-hオプションを付けてデータベースサーバーのIPアドレスを指定してやれば良いです。
WordPressでデータベースにリモート接続するなら、wp-config.phpで通常localhostを指定しているDB_HOSTの値にIPアドレスを指定します。
# diff wp-config.php wp-config.php.org
32c32
< define('DB_HOST', 'yyy.yyy.yyy.yyy');
---
> define('DB_HOST', 'localhost');
Nextcloudでデータベースにリモート接続するなら、configディレクトリ内にあるconfig.php内のdbhostの値をlocalhostからリモートのIPアドレスに書き換えます。
# diff config.php config.php.org
15c15
<   'dbhost' => 'yyy.yyy.yyy.yyy',
---
> 'dbhost' => 'localhost',なおNextcloudのデータ取り出しはNextcloudサーバのデータを引越すにはを参考にしました。
# sudo -u apache php /var/www/html/nextcloud/occ maintenance:mode --on
The current PHP memory limit is below the recommended value of 512MB.
Maintenance mode enabled
# mysqldump --single-transaction -unextcloud -p nextcloud > nextcloud.sql
Enter password:
# sudo -u apache php /var/www/html/nextcloud/occ maintenance:mode --off
The current PHP memory limit is below the recommended value of 512MB.
Maintenance mode disabled
MariaDBサーバー側ではこう。
$ mysql
Welcome to the MariaDB monitor. Commands end with ; or \g.
Your MariaDB connection id is 11374
Server version: 10.4.6-MariaDB-log FreeBSD Ports
Copyright (c) 2000, 2018, Oracle, MariaDB Corporation Ab and others.
Type 'help;' or '\h' for help. Type '\c' to clear the current input statement.
MariaDB [(none)]> create database nextcloud;
Query OK, 1 row affected (0.004 sec)
$ mysql nextcloud <nextcloud.sql
$ mysql
Welcome to the MariaDB monitor. Commands end with ; or \g.
Your MariaDB connection id is 11374
Server version: 10.4.6-MariaDB-log FreeBSD Ports
Copyright (c) 2000, 2018, Oracle, MariaDB Corporation Ab and others.
Type 'help;' or '\h' for help. Type '\c' to clear the current input statement.
MariaDB [(none)]> create user nextcloud@xxx.xxx.xxx.xxx identified by 'P@ssW0rd';
Query OK, 0 rows affected (0.043 sec)
MariaDB [(none)]> grant all privileges on nextcloud.* to nextcloud@xxx.xxx.xxx.xxx;
Query OK, 0 rows affected (0.004 sec)
MariaDB [(none)]> flush privileges;
Query OK, 0 rows affected (0.012 sec)
MariaDB [(none)]> quit;
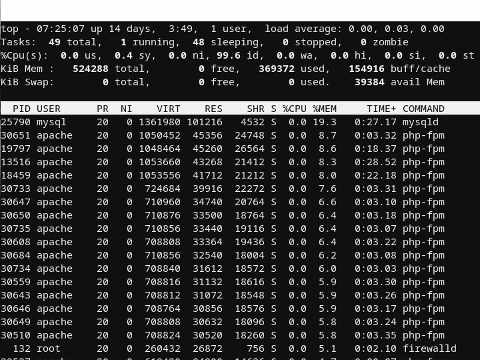
ByeこれでTime4VPS上のMariaDBを停止できます。ちなみに停止前はこのようにメインメモリの20%以上をMariaDBが専有していました。これはきつい。。。
実際にはTime4VPSがリトアニア、Vultrが東京ということでかなりタイムラグがあって使いにくかったので、Nextcloudのデータベースサーバー分離は恒久的には実施していません。