In the past, I thought I couldn’t set up Raspberry Pi without an HDMI display. But now, I can do it!
Necessarities to set up
The necessities to set up Pi are as below.
- Raspberry Pi2
- Enclosure
- Micro SD card (4GB)
- Micro SD card reader
- USB cable
- LAN cable
- Conversion cable (Lan to Thunderbolt)
- Mac computer
Install RASPBIAN
At first, you should download the OS image file from the RASPBIAN page on the official site. It is OK to get the LITE edition, because we will not use the X window system. (And our disk size is only 4GB!)
When the Mac has recognize the disk, you should confirm its device number with a “diskutil” utility.
[highlight_bash]
$ diskutil list
/dev/disk0 (internal):
#: TYPE NAME SIZE IDENTIFIER
0: GUID_partition_scheme 121.3 GB disk0
1: EFI EFI 314.6 MB disk0s1
2: Apple_CoreStorage Macintosh HD 120.4 GB disk0s2
3: Apple_Boot Recovery HD 650.0 MB disk0s3
… An omission …
/dev/disk3 (external, physical):
#: TYPE NAME SIZE IDENTIFIER
0: FDisk_partition_scheme *4.1 GB disk3
1: DOS_FAT_32 NO NAME 4.1 GB disk3s1
[/highlight_bash]
This time, the device number is disk3. After unmounting it, to start writing the data with a “dd” utility.
[highlight_bash]
$ diskutil unmountDisk /dev/disk3
Unmount of all volumes on disk3 was successful
$ sudo dd bs=1m if=~/Downloads/2016-02-26-raspbian-jessie-lite.img of=/dev/rdisk3
Password:
1298+0 records in
1298+0 records out
1361051648 bytes transferred in 1489.095115 secs (914013 bytes/sec)
$ diskutil eject /dev/disk3
Disk /dev/disk3 ejected
[/highlight_bash]
If you use the device name as rdisk instead of as disk, the writing speed will be made fast. You specify as “of=/dev/rdisk3” instead of as “of=/dev/disk3”, it becomes many times faster.
When finished writing the data, you should put the “ssh” file on the “boot” directory. And then you may remove the disk with an “eject” utility.
[highlight_bash]
$ touch /Volumes/boot/ssh
[/highlight_bash]
Sharing the internet connection
To connect the Raspberry Pi to the internet, to set up sharing the network of your Mac. To connect the Thunderbolt Ethernet to the Wi-Fi network of the Mac.
To set up by “System Preference > Sharing > Internet Sharing”.
By this, the Raspberry Pi connects to the internet world!
Linkage to Mac
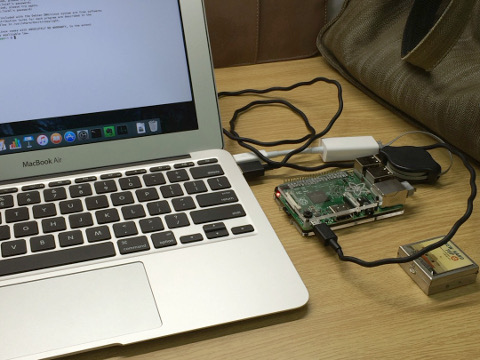
After set the micro SD card written the data, to the Raspberry Pi, and to connect the Raspberry Pi with the Mac by the LAN and USB cable.
Raspberry Pi has no power switch, so it boots up as soon as connected to the USB port. However, you cannot connect by ssh until finish the boot process.
When the flash of the access lamp on the board has stopped, you can connect by ssh to the Raspberry Pi.